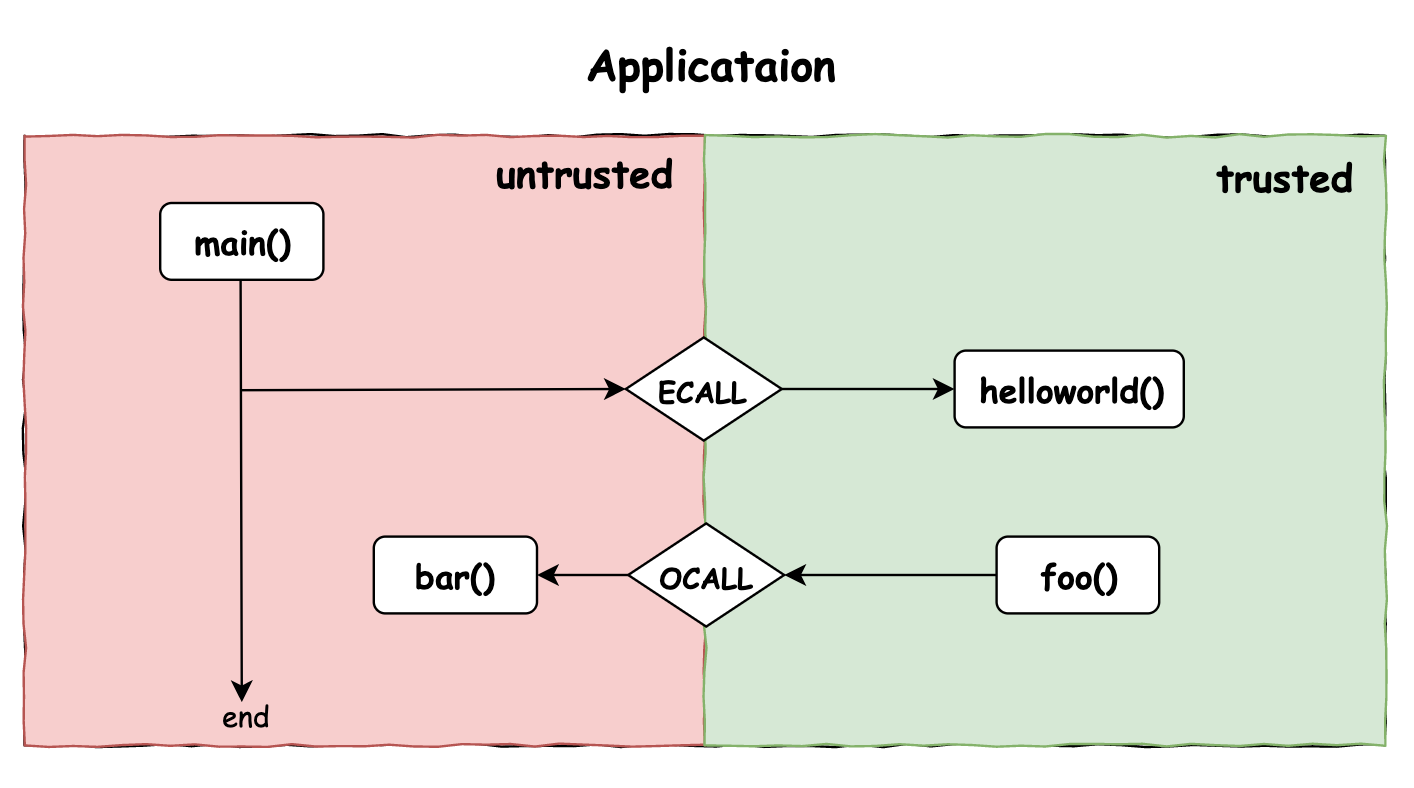
基本原理
SGX应用由两部分组成:
untrusted 不可信区
trusted 可信区
非可信区只能通过ECALL函数调用可信区内的函数,可信区只能通过OCALL函数调用非可信区的函数。ECALL函数和OCALL函数通过EDL文件声明。
第一个SGX程序 目录结构 1 2 3 4 5 6 7 8 9 10 11 12 13 first_enclave/ ├── App │ ├── App.cpp │ └── App.h ├── Enclave │ ├── Enclave.config.xml │ ├── Enclave.cpp │ ├── Enclave.edl │ ├── Enclave.h │ ├── Enclave.lds │ └── Enclave_private.pem ├── Include └── Makefile
上面目录结构仿照了sgxsdk/SampleCode目录下示例代码目录:
App目录内为不可信区域代码,包括main入口、OCALL函数内具体逻辑代码等等。
Enclave目录为可信区域代码,包括ECALL函数内具体逻辑代码实现。
Enclave.edl
Enclave.lds
Enclave_private.pem
Enclave.config.xml
Enclave.h & Enclave.cpp
Include目录是不可信代码和可信代码共享的头文件。
代码清单 Enclave/Enclave.edl
1 2 3 4 5 enclave { trusted { public void ecall_hello_from_enclave([out, size=len] char* buf, size_t len); }; };
EDL中声明了一个公共ECALL函数,每个SGX应用的EDL必须至少声明一个public类型的ECALL函数。Enclave/Enclave.lds
1 2 3 4 5 6 7 8 9 10 enclave.so { global: g_global_data_sim; g_global_data; enclave_entry; g_peak_heap_used; local: *; };
Enclave/Enclave.config.xml
1 2 3 4 5 6 7 8 9 10 11 12 <EnclaveConfiguration > <ProdID > 0</ProdID > <ISVSVN > 0</ISVSVN > <StackMaxSize > 0x40000</StackMaxSize > <HeapMaxSize > 0x100000</HeapMaxSize > <TCSNum > 10</TCSNum > <TCSPolicy > 1</TCSPolicy > <DisableDebug > 0</DisableDebug > <MiscSelect > 0</MiscSelect > <MiscMask > 0xFFFFFFFF</MiscMask > </EnclaveConfiguration >
Enclave/Enclave.h
1 2 3 #ifndef _ENCLAVE_H_ #define _ENCLAVE_H_ #endif
Enclave/Enclave.cpp
1 2 3 4 5 6 7 8 9 10 11 12 13 14 #include "Enclave.h" #include "Enclave_t.h" #include <string.h> void ecall_hello_from_enclave (char *buf, size_t len) const char *hello = "Hello world" ; size_t size = len; if (strlen (hello) < len) { size = strlen (hello) + 1 ; } memcpy (buf, hello, size-1 ); buf[size-1 ] = '\0' ; }
Enclave/Enclave_private.pem
1 $ openssl genrsa -out Enclave/Enclave_private.pem -3 3072
App/App.h
1 2 3 4 5 6 7 8 9 10 11 12 13 14 15 16 17 18 19 20 21 22 23 24 25 26 27 28 29 30 31 32 33 34 #ifndef _APP_H_ #define _APP_H_ #include <assert.h> #include <stdio.h> #include <stdlib.h> #include <stdarg.h> #include "sgx_error.h" #include "sgx_eid.h" #ifndef TRUE # define TRUE 1 #endif #ifndef FALSE # define FALSE 0 #endif # define TOKEN_FILENAME "enclave.token" # define ENCLAVE_FILENAME "enclave.signed.so" extern sgx_enclave_id_t global_eid; #if defined(__cplusplus) extern "C" {#endif #if defined(__cplusplus) } #endif #endif
App/App.cpp
1 2 3 4 5 6 7 8 9 10 11 12 13 14 15 16 17 18 19 20 21 22 23 24 25 26 27 28 29 30 31 32 33 34 35 36 37 38 39 40 41 42 43 44 45 46 47 48 49 50 51 52 53 54 55 56 57 58 59 60 #include <stdio.h> #include <string.h> #include <assert.h> # include <unistd.h> # include <pwd.h> # define MAX_PATH FILENAME_MAX #include "sgx_urts.h" #include "App.h" #include "Enclave_u.h" sgx_enclave_id_t global_eid = 0 ;int initialize_enclave (void ) sgx_status_t ret = SGX_ERROR_UNEXPECTED; ret = sgx_create_enclave(ENCLAVE_FILENAME, SGX_DEBUG_FLAG, NULL , NULL , &global_eid, NULL ); if (ret != SGX_SUCCESS) { printf ("Failed to create enclave, ret code: %d\n" , ret); return -1 ; } return 0 ; } int SGX_CDECL main (int argc, char *argv[]) (void )(argc); (void )(argv); const size_t max_buf_len = 100 ; char buffer[max_buf_len] = {0 }; if (initialize_enclave() < 0 ){ printf ("Enter a character before exit ...\n" ); getchar(); return -1 ; } ecall_hello_from_enclave(global_eid, buffer, max_buf_len); printf ("%s\n" , buffer); sgx_destroy_enclave(global_eid); printf ("Info: SampleEnclave successfully returned.\n" ); printf ("Enter a character before exit ...\n" ); getchar(); return 0 ; }
Makefile Makefile 即可。
编译运行 直接在项目目录下执行make命令即可,在项目根目录下会生成一个app可执行文件,运行这个app:
1 2 3 4 5 6 7 8 9 10 11 12 13 14 $ make make[1]: Entering directory '/root/practice/first_enclave' GEN => App/Enclave_u.h CC <= App/Enclave_u.c CXX <= App/App.cpp ... Succeed. SIGN => enclave.signed.so The project has been built in debug hardware mode. make[1]: Leaving directory '/root/practice/first_enclave' $ ./app Hello world Info: SampleEnclave successfully returned. Enter a character before exit ...
编译流程(Makefile):
1 2 3 4 5 6 7 8 9 10 11 12 13 14 15 16 17 18 19 20 21 22 23 24 first_enclave ├── app #[generated] ├── App │ ├── App.cpp │ ├── App.h │ ├── App.o #[generated] │ ├── Enclave_u.c #[generated] │ ├── Enclave_u.h #[generated] │ └── Enclave_u.o #[generated] ├── Enclave │ ├── Enclave.config.xml │ ├── Enclave.cpp │ ├── Enclave.edl │ ├── Enclave.h │ ├── Enclave.lds │ ├── Enclave.o #[generated] │ ├── Enclave_private.pem │ ├── Enclave_t.c #[generated] │ ├── Enclave_t.h #[generated] │ └── Enclave_t.o #[generated] ├── enclave.signed.so #[generated] ├── enclave.so #[generated] ├── Include └── Makefile
参考 SGX入门:如何开发第一个最简单的 SGX 应用 HelloWorld
