BruceFan's Blog

Stay hungry, stay foolish

0%

Frida解决Android Crackme2

crackme2也是一道OWASP的Android题目,下面就用frida来解决它。
和crackme1一样,在模拟器中运行时会检测它是在root设备上运行的。
用JEB反编译之后,MainActivity如下:

1
2
3
4
5
6
7
8
9
10
11
12
13
14
15
16
17
18
19
20
21
22
23
24
25
26
27
28
29
30
31
32
33
34
35
36
37
38
39
40
41
42
43
44
45
46
47
48
49
50
51
52
53
54
55
56
57
58
59
60
61
62
63
64
65
66
67
68
69
70
71
72
73
74
75
76
77
78
79
80
81
82
83
84
85
86
87
88
89
package sg.vantagepoint.uncrackable2;

public class MainActivity extends c {
private CodeCheck m;

static {
System.loadLibrary("foo");
}

public MainActivity() {
super();
}

private void a(String arg5) {
AlertDialog v0 = new AlertDialog$Builder(((Context)this)).create();
v0.setTitle(((CharSequence)arg5));
v0.setMessage("This in unacceptable. The app is now going to exit.");
v0.setButton(-3, "OK", new DialogInterface$OnClickListener() {
public void onClick(DialogInterface arg2, int arg3) {
System.exit(0);
}
});
v0.setCancelable(false);
v0.show();
}

static void a(MainActivity arg0, String arg1) {
arg0.a(arg1);
}

private native void init() {}

protected void onCreate(Bundle arg5) {
Void v3 = null;
this.init();
if((b.a()) || (b.b()) || (b.c())) {
this.a("Root detected!");
}

if(a.a(this.getApplicationContext())) {
this.a("App is debuggable!");
}

new AsyncTask() {
protected String a(Void[] arg3) {
while(!Debug.isDebuggerConnected()) {
SystemClock.sleep(100);
}

return null;
}

protected void a(String arg3) {
MainActivity.a(this.a, "Debugger detected!");
}

protected Object doInBackground(Object[] arg2) {
return this.a(((Void[])arg2));
}

protected void onPostExecute(Object arg1) {
this.a(((String)arg1));
}
}.execute(new Void[]{v3, v3, v3});
this.m = new CodeCheck();
super.onCreate(arg5);
this.setContentView(2130968603);
}

public void verify(View arg5) {
String v0 = this.findViewById(2131427422).getText().toString();
AlertDialog v1 = new AlertDialog$Builder(((Context)this)).create();
if(this.m.a(v0)) {
v1.setTitle("Success!");
v1.setMessage("This is the correct secret.");
}
else {
v1.setTitle("Nope...");
v1.setMessage("That\'s not it. Try again.");
}

v1.setButton(-3, "OK", new DialogInterface$OnClickListener() {
public void onClick(DialogInterface arg1, int arg2) {
arg1.dismiss();
}
});
v1.show();
}
}

尝试像前面一样hook OnClickListener,启动frida-server:

1
2
$ adb shell 
generic:/ # ./data/local/tmp/frida-server

启动crackme2应用,连接frida:

1
2
3
$ frida -U sg.vantagepoint.uncrackable2
...
Failed to attach: ambiguous name; it matches: sg.vantagepoint.uncrackable2 (pid: 3844), sg.vantagepoint.uncrackable2 (pid: 3859)

有两个名称相同的进程,可以验证一下:

1
2
3
$ frida-ps -U
3844 sg.vantagepoint.uncrackable2
3859 sg.vantagepoint.uncrackable2

尝试注入父进程:

1
2
3
$ frida -U 3844
...
Failed to attach: unable to access process with pid 3844 due to system restrictions; try `sudo sysctl kernel.yama.ptrace_scope=0`, or run Frida as root

查看反编译的MainActivity,程序加载了libfoo.so,onCreate()方法的第一行调用了一个native方法init(),这个方法应该是libfoo.so中的。一开始我用radare2打开armeabi目录下的so文件,查看init()函数,查看跳转到的子函数0x11c0。看到反汇编的代码很奇怪,其实这里的代码是thumb指令,而按照ARM模式进行了反汇编,调整方法是在visual mode下按:,输入命令e asm.bits=16,按照thumb模式进行反汇编。反汇编正常后,发现函数都是用地址表示,不知道调用的是什么函数。改为查看x86_64目录下的so文件。

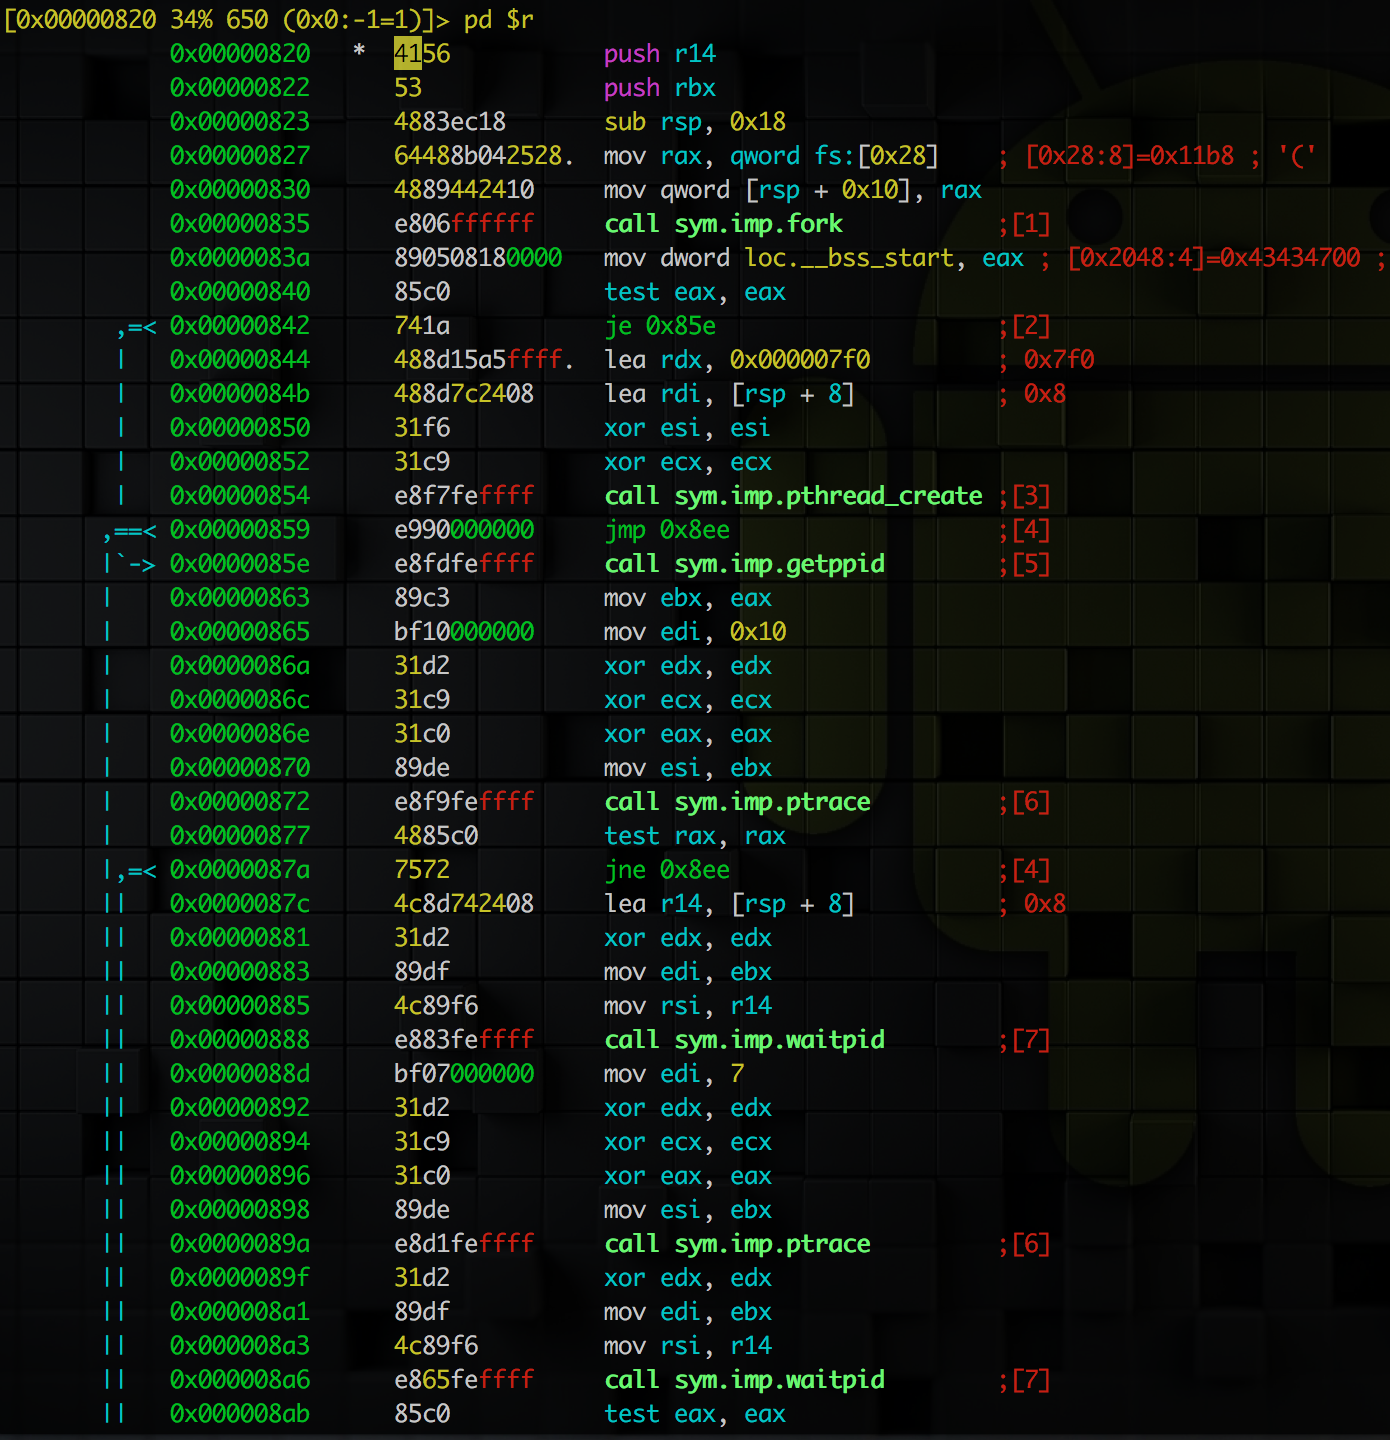
其实这里改为x86_64有多个原因:
(1)Mac上即使在radare2中输入e asm.bits=16也不能正常按thumb模式反汇编,在Ubuntu上能正常反汇编。
(2)正常反汇编arm的so文件看不到函数的名字,不知道调用了什么函数。
(3)后面frida hook native函数的时候,arm和x86都会有”Error: unable to intercept function at ***”的错误,只有x86_64能正常hook。不知道是不是这些开源软件在Mac上都有各种各样的bug,还是我用的不对。

列出x86_64 so文件的导出函数:

1
2
3
4
5
6
7
8
9
10
11
$ r2 libfoo.so
-- This page intentionally left blank.
[0x000007a0]> iE
[Exports]
vaddr=0x00000a00 paddr=0x00000a00 ord=009 fwd=NONE sz=433 bind=GLOBAL type=FUNC name=Java_sg_vantagepoint_uncrackable2_CodeCheck_bar
vaddr=0x000009f0 paddr=0x000009f0 ord=010 fwd=NONE sz=15 bind=GLOBAL type=FUNC name=Java_sg_vantagepoint_uncrackable2_MainActivity_init
vaddr=0x00002048 paddr=0x00001048 ord=014 fwd=NONE sz=0 bind=GLOBAL type=NOTYPE name=__bss_start
vaddr=0x00002048 paddr=0x00001048 ord=015 fwd=NONE sz=0 bind=GLOBAL type=NOTYPE name=__bss_start
vaddr=0x0000204d paddr=0x0000204d ord=016 fwd=NONE sz=0 bind=GLOBAL type=NOTYPE name=_end

5 exports

Java_sg_vantagepoint_uncrackable2_MainActivity_init和Java_sg_vantagepoint_uncrackable2_CodeCheck_bar两个函数是我们需要关注的,先看一下init()函数:

1
2
3
4
5
6
7
8
9
10
[0x000007a0]> s 0x9f0
[0x000009f0]> V #切换到visual mode,p/P切换view
[0x000009f0 41% 672 libfoo.so]> pd $r @ sym.Java_sg_vantagepoint_uncrackable2_MainActivity_init
;-- Java_sg_vantagepoint_uncrackable2_MainActivity_init:
0x000009f0 50 push rax
0x000009f1 e82afeffff call 0x820 ;[1]
0x000009f6 c6054f160000. mov byte [0x0000204c], 1 ; [0x204c:1]=58 ; ": (GNU) 4.9.x 20150123 (prerelease)" 0x0000204c ; ": (GNU) 4.9.x 20150123 (prerelease)"
0x000009fd 58 pop rax
0x000009fe c3 ret
0x000009ff 90 nop

查看init()函数的子函数0x820:

visual mode下按c显示一个游标,移动游标到call 0x820这一行,按回车就跳转过去(按u跳转回来)

这个函数里调用了fork、pthread_create、getppid、ptrace和waitpid等函数。这是一个基本的反调试技术,附加调试进程被阻止,因为已经有其他进程作为调试器连接。
我们可以让frida为我们生成一个进程而不是将它注入到运行中的进程中。

1
$ frida -U -f sg.vantagepoint.uncrackable2

这样frida注入到Zygote中,生成我们的进程并且等待输入,使反调试失效。
在摆脱反调试之后,应用程序还是会检测root,点击OK后退出。可以用frida来hook System.exit函数,使其失效。

1
2
3
4
5
6
7
8
9
10
setImmediate(function() {
console.log("[*] Starting script");
Java.perform(function() {
exitClass = Java.use("java.lang.System");
exitClass.exit.implementation = function() {
console.log("[*] System.exit called");
}
console.log("[*] Hooking calls to System.exit");
});
});

关闭所有正在运行的crackme2进程,用frida运行它:

1
2
3
4
5
6
$ frida -U -f sg.vantagepoint.uncrackable2 -l uncrackable2.js --no-pause
...
Spawned `sg.vantagepoint.uncrackable2`. Resuming main thread!
[*] Starting script
[USB::Android Emulator 5554::['sg.vantagepoint.uncrackable2']]-> [*] Hooking calls to System.exit
[*] System.exit called

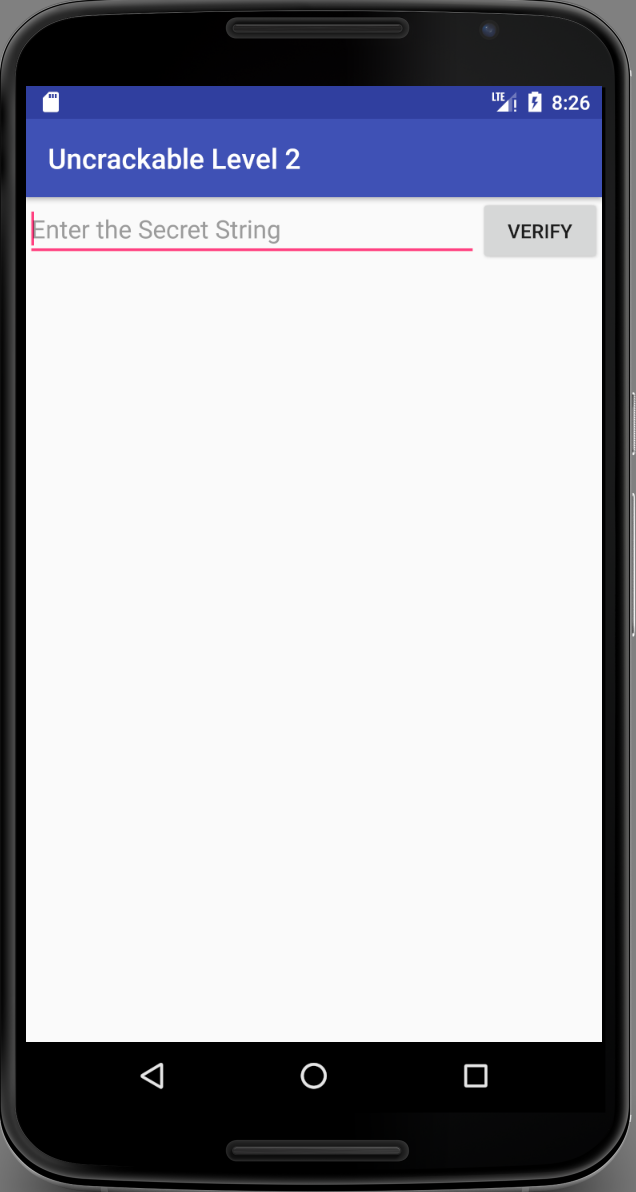
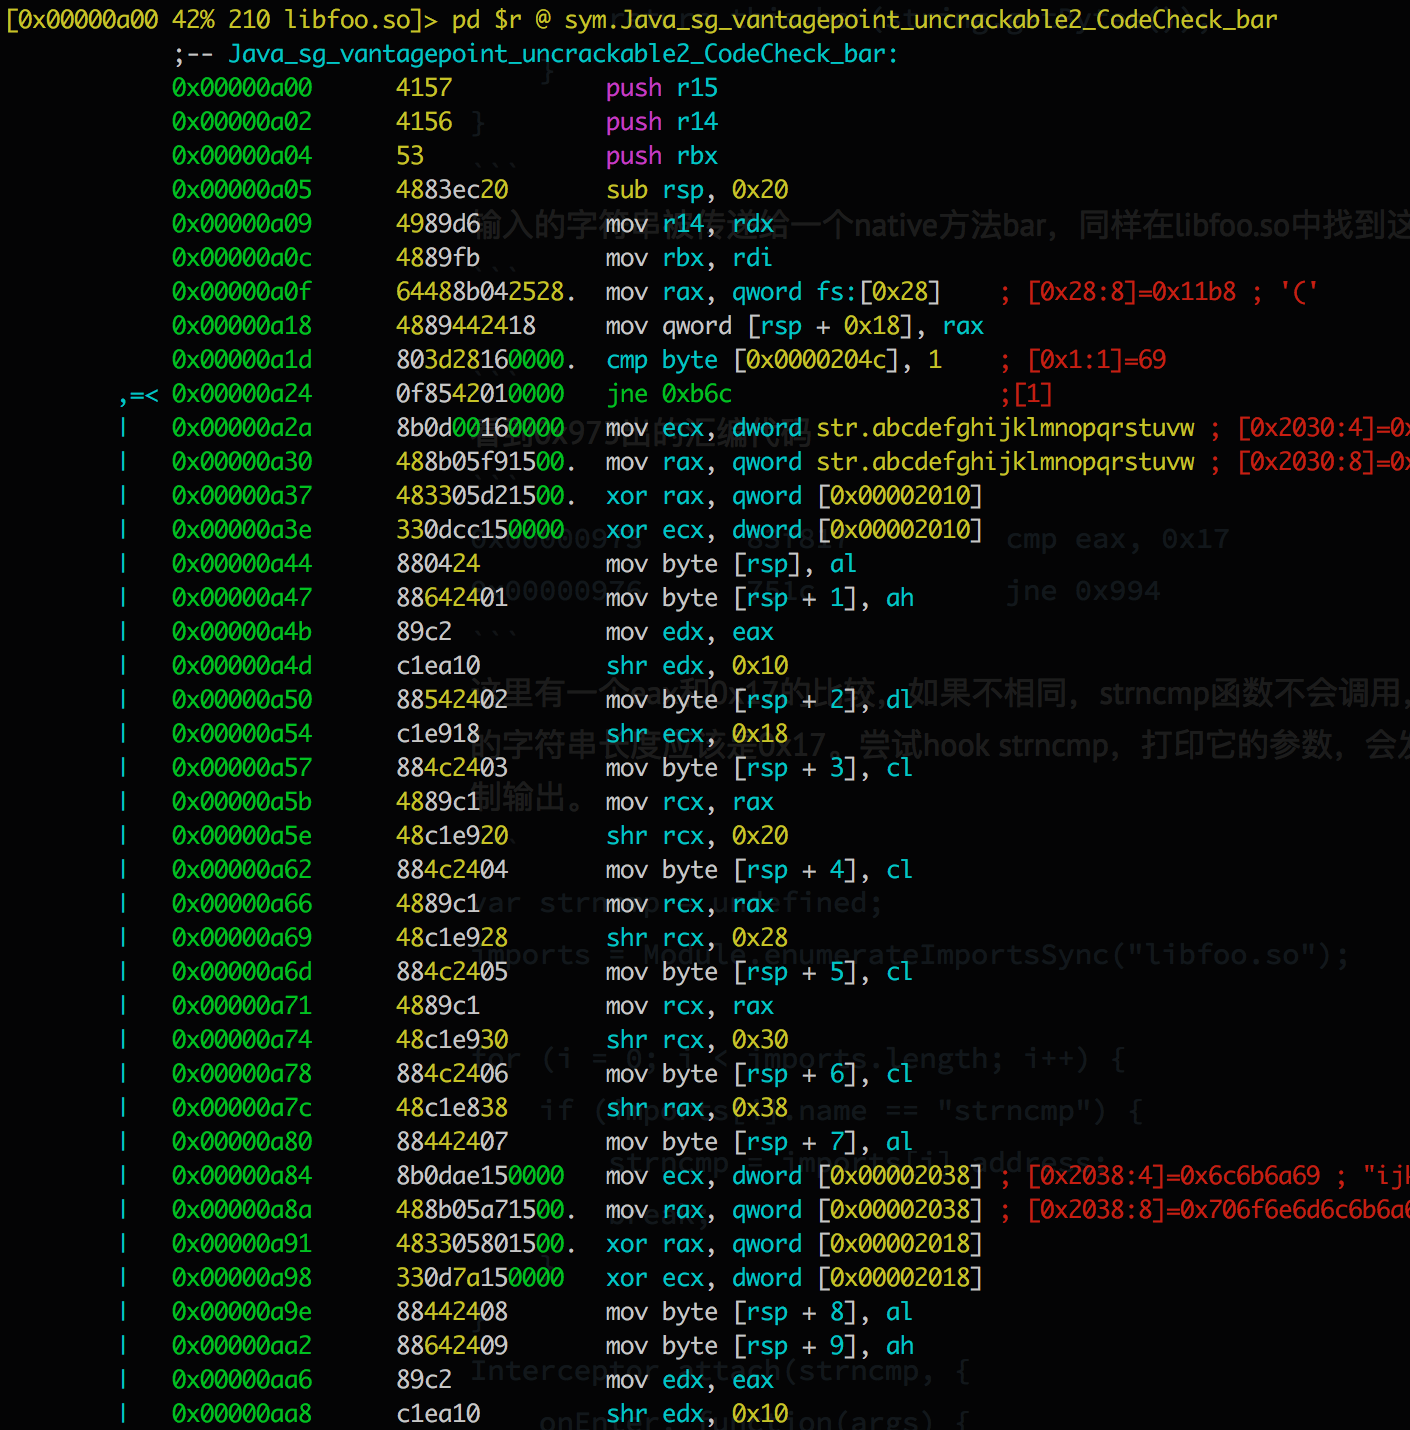
等到出现[*] Hooking calls to System.exit,点击OK,程序就不会退出了。

程序需要输入一个字符串,需要继续分析MainActivity:

1
2
3
4
5
6
this.m = new CodeCheck();
...
if (this.m.a(string)) {
Dialog.setTitle((CharSequence)"Success!");
Dialog.setMessage((CharSequence)"This is the correct secret.");
}

看看CodeCheck类:

1
2
3
4
5
6
7
8
package sg.vantagepoint.uncrackable2;
public class CodeCheck {
private native boolean bar(byte[] var1);

public boolean a(String string) {
return this.bar(string.getBytes());
}
}

输入的字符串被传递给一个native方法bar,同样在libfoo.so中找到这个函数:

看到0xb52处的汇编代码

1
2
0x00000b52      83f817         cmp eax, 0x17
0x00000b55 7515 jne 0xb6c

这里有一个eax和0x17的比较,如果不相同,strncmp函数不会调用,0x17是strncmp的一个参数。可以猜测输入的字符串长度应该是0x17。尝试hook strncmp,打印它的参数,会发现strncmp被调用了很多次,需要进一步限制输出。

1
2
3
4
5
6
7
8
9
10
11
12
13
14
15
16
var strncmp = undefined;
imports = Module.enumerateImportsSync("libfoo.so");

for (i = 0; i < imports.length; i++) {
if (imports[i].name == "strncmp") {
strncmp = imports[i].address;
break;
}
}
Interceptor.attach(strncmp, {
onEnter: function(args) {
if (args[2].toInt32() == 23 && Memory.readUtf8String(args[0], 23) == "01234567890123456789012") {
console.log("[*] Secret string at " + args[1] + ": " + Memory.readUtf8String(args[1], 23));
}
},
});

1.该脚本调用Module.enumerateImportsSync()以从libfoo.so中获取有关导入信息的对象数组。我们遍历这个数组,直到找到strncmp并检索其地址。然后我们将Interceptor附加到它。
2.Java中的字符串不会以null结束。当strncmp使用frida的Memory.readUtf8String方法访问字符串指针的内存位置并且不提供长度时,frida会期待一个\0结束符,或者输出一些垃圾内存。它不知道字符串在哪里结束。如果我们指定要读取的字符数量作为第二个参数就解决了这个问题。
3.如果我们没有限制strncmp参数的条件将得到很多输出。限制条件为第三个参数size_t为23。
如何知道args[0]是我们的输入,args[1]是我们寻找的字符串,这个是试出来的。
启动frida加载这个脚本:

1
2
3
4
5
6
7
8
frida -U -f sg.vantagepoint.uncrackable2 -l uncrackable2.js --no-pause
...
Spawned `sg.vantagepoint.uncrackable2`. Resuming main thread!
[*] Starting script
[USB::Android Emulator 5554::['sg.vantagepoint.uncrackable2']]-> [*] Hooking calls to System.exit
[*] Intercepting strncmp
[*] System.exit called
[*] Secret string at 0x7fff9553d870: thanks for all the fish

输入字符串”01234567890123456789012”按VERIFY,终端会显示正确答案:Thanks for all the fish
reference
利用FRIDA攻击Android应用程序(三)