原理解析
下面看一下Android中加壳的原理: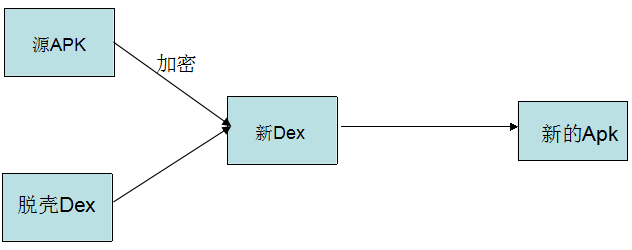
在加固过程中需要三个对象:
- 需要加密的APK(源程序APK)
- 壳程序APK(负责解密APK工作)
- 加密工具(将源APK进行加密和壳程序的DEX合并)
主要步骤
用加密算法对源程序APK进行加密,再将其与壳程序APK的DEX文件合并生成新的DEX文件,最后替换壳程序中的原DEX文件即可。得到新的APK也叫做脱壳程序APK,它已经不是一个完整意义上的APK程序了,它的主要工作是:负责解密源程序APK,然后加载APK,让其正常运行起来。
在这个过程中需要了解的知识是:如何将源程序APK和壳程序APK进行合并
这需要了解DEX文件的格式,下面简单介绍一下:
| address | name | size/byte | value |
|---|---|---|---|
| 0 | magic[8] | 8 | 0x6465 780a 3033 3500 |
| 8 | checksum | 4 | 0xc136 5e17 |
| c | signature[20] | 20 | |
| 20 | file_size | 4 | 0x02e4 |
| 24 | header_size | 4 | 0x70 |
| 28 | endian_tag | 4 | 0x12345678 |
| 2C | link_size | 4 | 0x00 |
| 30 | link_off | 4 | 0x00 |
| 34 | map_off | 4 | 0x0244 |
| 38 | string_ids_size | 4 | 0x0e |
| 3c | string_ids_off | 4 | 0x70 |
| 40 | type_ids_size | 4 | 0x07 |
| 44 | type_ids_off | 4 | 0xa8 |
| 48 | proto_ids_size | 4 | 0x03 |
| 4C | proto_ids_off | 4 | 0xc4 |
| 50 | field_ids_size | 4 | 0x01 |
| 54 | field_ids_off | 4 | 0xe8 |
| 58 | method_ids_size | 4 | 0x04 |
| 5C | method_ids_off | 4 | 0xf0 |
| 60 | class_defs_size | 4 | 0x01 |
| 64 | class_defs_off | 4 | 0x0110 |
| 68 | data_size | 4 | 0x01b4 |
| 6C | data_off | 4 | 0x0130 |
现在只要关注其中三个部分:
- checksum(文件校验码)使用alder32算法校验文件,除去magic、checksum外余下的所有文件区域,用于检查文件错误。
- signature 使用SHA-1算法hash出去magic、checksum和signature外余下的所有文件区域,用于唯一识别本文件。
- file_size DEX文件大小。
我们需要将加密之后的源程序APK文件写入到DEX中,那么就需要修改checksum,因为它的值和文件内容有关。signature也是一样,也是唯一识别文件的算法,还有DEX文件的大小。
还需要一个操作,就是标注加密之后的源程序APK文件的大小,因为运行解密的时候,需要知道APK的大小,才能正确得到源程序APK。这个值直接放到文件的末尾就可以了。
修改之后的DEX文件的格式如下: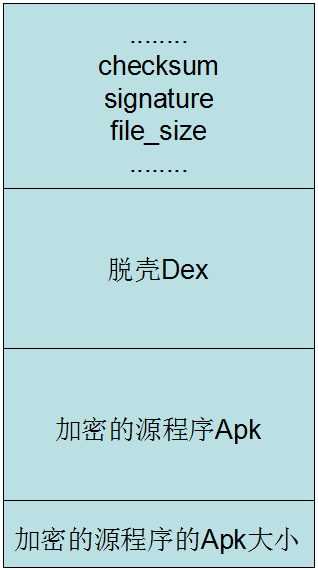
知道了原理,下面就是代码实现了。这里有三个工程:
- 源程序项目(需要加密的APK)
- 壳项目(解密源程序APK和加载APK)
- 对源APK进行加密和壳项目的DEX的合并
项目案例
下面先来看一下源程序
1.需要加密的源程序项目:SourceApk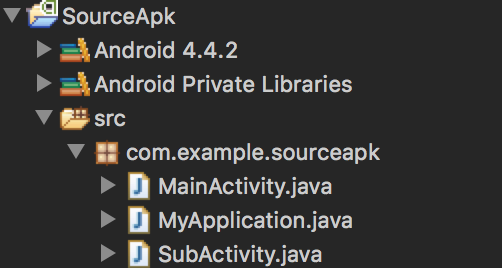
需要一个Application类,这个到后面说为什么需要:
MyApplication.java
1 | package com.example.sourceapk; |
就是打印一下onCreate方法。
MainActivity.java
1 | package com.example.sourceapk; |
2.加壳程序项目:DexPackTool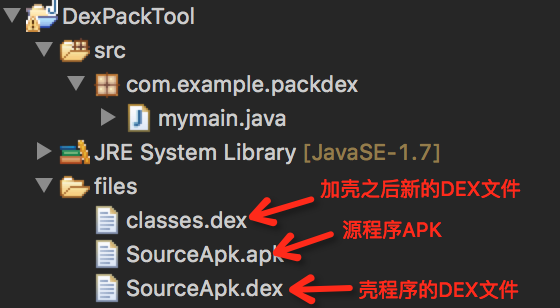
加壳程序其实就是一个Java工程,它的工作就是加密源程序APK,然后将其写入到壳程序的DEX文件里,修改文件头,得到一个新的DEX文件。
看一下代码:
1 | package com.example.packdex; |
加密算法很简单,只是对每个字节进行异或一下。
这里是为了简单,所以就用了很简单的加密算法,其实为了增加破解难度,我们应该使用更高效的加密算法,同时最好将加密操作放到native层去做。
这里需要两个输入文件:
- 源程序APK文件:SourceApk.apk
- 壳程序的DEX文件:SourceApk.dex
第一个文件就是源程序项目编译之后的APK文件,第二个文件是下面要讲的第三个项目:壳程序项目中的classes.dex文件,修改名称之后得到。
3.壳程序项目:PackApk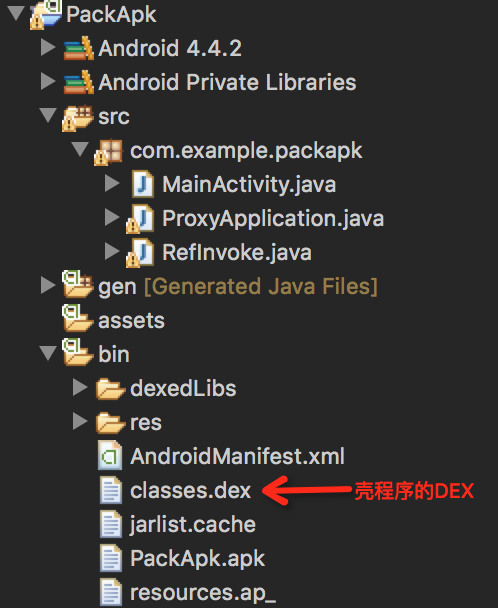
先来了解一下壳程序项目的工作:
- 通过反射置换android.app.ActivityThread中的mClassLoader为加载解密出APK的DexClassLoader,该DexClassLoader一方面加载了源程序,另一方面以原mClassLoader为父节点,这就保证即加载了源程序,又没有放弃原先加载的资源与系统代码。
关于这部分内容不了解的可以看一下Android动态加载之免安装运行程序这篇文章。 - 找到源程序的Application,通过反射建立并运行。
这里需要注意的是,我们现在是加载一个完整的APK,让他运行起来。一个APK运行的时候都是有一个Application对象的,这个也是一个程序运行之后的全局类,所以我们必须找到解密之后的源程序APK的Application类,运行它的onCreate方法,这样源程序APK才开始它的运行生命周期。后面会说如何得到源程序APK的Application类:使用meta标签进行设置。
下面看一下整体流程: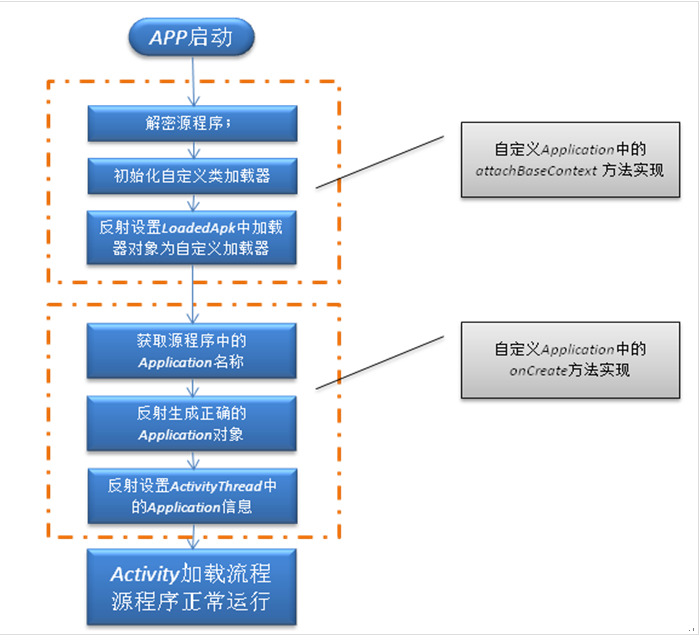
下面看一下代码:
ProxyApplication.java
- 得到壳程序APK中的DEX文件,然后从这个文件中得到源程序APK进行解密、加载 这里需要注意的一个问题,就是我们需要找到一个时机,就是在壳程序还没有运行起来的时候,来加载源程序的APK,执行它的onCreate方法,那么这个时机不能太晚,不然的话,就是运行壳程序,而不是源程序了。查看源码我们知道。Application中有一个方法:attachBaseContext这个方法,它在Application的onCreate方法执行前就会执行了,所以我们的工作就需要在这里进行。
1
2
3
4
5
6
7
8
9
10
11
12
13
14
15
16
17
18
19
20
21
22
23
24
25
26
27
28
29
30
31
32
33
34
35
36
37
38
39
40
41
42
43
44
45
46
47
48
49
50
51// 这是context赋值
protected void attachBaseContext(Context base) {
super.attachBaseContext(base);
try {
// 创建两个文件夹payload_odex、payload_lib,私有的,可写的文件目录
File odex = this.getDir("payload_odex", MODE_PRIVATE);
File libs = this.getDir("payload_lib", MODE_PRIVATE);
odexPath = odex.getAbsolutePath();
libPath = libs.getAbsolutePath();
apkFileName = odex.getAbsolutePath() + "/payload.apk";
File dexFile = new File(apkFileName);
Log.i("demo", "apk size:"+dexFile.length());
if (!dexFile.exists())
{
dexFile.createNewFile(); //在payload_odex文件夹内,创建payload.apk
// 读取程序classes.dex文件
byte[] dexdata = this.readDexFileFromApk();
// 分离出解壳后的apk文件已用于动态加载
this.splitPayLoadFromDex(dexdata);
}
// 配置动态加载环境
Object currentActivityThread = RefInvoke.invokeStaticMethod(
"android.app.ActivityThread", "currentActivityThread",
new Class[] {}, new Object[] {});//获取主线程对象
String packageName = this.getPackageName();//当前apk的包名
ArrayMap mPackages = (ArrayMap) RefInvoke.getFieldOjbect(
"android.app.ActivityThread", currentActivityThread,
"mPackages");
WeakReference wr = (WeakReference) mPackages.get(packageName);
// 创建被加壳apk的DexClassLoader对象 加载apk内的类和本地代码(c/c++代码)
DexClassLoader dLoader = new DexClassLoader(apkFileName, odexPath,
libPath, (ClassLoader) RefInvoke.getFieldOjbect(
"android.app.LoadedApk", wr.get(), "mClassLoader"));
//把当前进程的mClassLoader设置成了被加壳apk的DexClassLoader
RefInvoke.setFieldOjbect("android.app.LoadedApk", "mClassLoader",
wr.get(), dLoader);
Log.i("demo","classloader:"+dLoader);
try{
Object actObj = dLoader.loadClass("com.example.sourceapk.MainActivity");
Log.i("demo", "actObj:"+actObj);
}catch(Exception e){
Log.i("demo", "activity:"+Log.getStackTraceString(e));
}
} catch (Exception e) {
Log.i("demo", "error:"+Log.getStackTraceString(e));
e.printStackTrace();
}
}
A) 从APK中获取到DEX文件B) 从壳程序DEX中得到源程序APK文件1
2
3
4
5
6
7
8
9
10
11
12
13
14
15
16
17
18
19
20
21
22
23
24
25
26
27
28
29
30/**
* 从apk包里面获取dex文件内容(byte)
* @return
* @throws IOException
*/
private byte[] readDexFileFromApk() throws IOException {
ByteArrayOutputStream dexByteArrayOutputStream = new ByteArrayOutputStream();
ZipInputStream localZipInputStream = new ZipInputStream(
new BufferedInputStream(new FileInputStream(
this.getApplicationInfo().sourceDir)));
while (true) {
ZipEntry localZipEntry = localZipInputStream.getNextEntry();
if (localZipEntry == null) {
localZipInputStream.close();
break;
}
if (localZipEntry.getName().equals("classes.dex")) {
byte[] arrayOfByte = new byte[1024];
while (true) {
int i = localZipInputStream.read(arrayOfByte);
if (i == -1)
break;
dexByteArrayOutputStream.write(arrayOfByte, 0, i);
}
}
localZipInputStream.closeEntry();
}
localZipInputStream.close();
return dexByteArrayOutputStream.toByteArray();
}C) 解密源程序APK1
2
3
4
5
6
7
8
9
10
11
12
13
14
15
16
17
18
19
20
21
22
23
24
25
26
27
28
29
30
31
32
33
34
35
36
37
38
39
40
41
42
43
44
45
46
47
48
49
50
51
52
53
54
55
56
57
58
59
60
61
62/**
* 释放被加壳的apk文件,so文件
* @param data
* @throws IOException
*/
private void splitPayLoadFromDex(byte[] apkdata) throws IOException {
int ablen = apkdata.length;
//取被加壳apk的长度 这里的长度取值,对应加壳时长度的赋值都可以做些简化
byte[] dexlen = new byte[4];
System.arraycopy(apkdata, ablen - 4, dexlen, 0, 4);
ByteArrayInputStream bais = new ByteArrayInputStream(dexlen);
DataInputStream in = new DataInputStream(bais);
int readInt = in.readInt();
System.out.println(Integer.toHexString(readInt));
byte[] newdex = new byte[readInt];
//把被加壳的源程序apk内容拷贝到newdex中
System.arraycopy(apkdata, ablen - 4 - readInt, newdex, 0, readInt);
//这里应该加上对于apk的解密操作,若加壳是加密处理的话
// 对源程序Apk进行解密
newdex = decrypt(newdex);
// 写入apk文件
File file = new File(apkFileName);
try {
FileOutputStream localFileOutputStream = new FileOutputStream(file);
localFileOutputStream.write(newdex);
localFileOutputStream.close();
} catch (IOException localIOException) {
throw new RuntimeException(localIOException);
}
// 分析被加壳的apk文件
ZipInputStream localZipInputStream = new ZipInputStream(
new BufferedInputStream(new FileInputStream(file)));
while (true) {
ZipEntry localZipEntry = localZipInputStream.getNextEntry(); // 这个也遍历子目录
if (localZipEntry == null) {
localZipInputStream.close();
break;
}
// 取出被加壳apk用到的so文件,放到libPath中(data/data/包名/payload_lib)
String name = localZipEntry.getName();
if (name.startsWith("lib/") && name.endsWith(".so")) {
File storeFile = new File(libPath + "/"
+ name.substring(name.lastIndexOf('/')));
storeFile.createNewFile();
FileOutputStream fos = new FileOutputStream(storeFile);
byte[] arrayOfByte = new byte[1024];
while (true) {
int i = localZipInputStream.read(arrayOfByte);
if (i == -1)
break;
fos.write(arrayOfByte, 0, i);
}
fos.flush();
fos.close();
}
localZipInputStream.closeEntry();
}
localZipInputStream.close();
}1
2
3
4
5
6
7//直接返回数据,读者可以添加自己解密方法
private byte[] decrypt(byte[] srcdata) {
for(int i=0;i<srcdata.length;i++){
srcdata[i] = (byte)(0xFF ^ srcdata[i]);
}
return srcdata;
} - 找到源程序的Application程序,让其运行 直接在壳程序的Application中的onCreate方法中进行就可以了。这里还可以看到是通过AndroidManifest.xml中的meta标签获取源程序APK中的Application对象的。
1
2
3
4
5
6
7
8
9
10
11
12
13
14
15
16
17
18
19
20
21
22
23
24
25
26
27
28
29
30
31
32
33
34
35
36
37
38
39
40
41
42
43
44
45
46
47
48
49
50
51
52
53
54
55
56
57
58
59
60
61
62
63
64
65
66
67
68
69
70
71
72
73
74
75
public void onCreate() {
{
//loadResources(apkFileName);
Log.i("demo", "onCreate");
// 如果源应用配置有Appliction对象,则替换为源应用Applicaiton,以便不影响源程序逻辑。
String appClassName = null;
try {
ApplicationInfo ai = this.getPackageManager()
.getApplicationInfo(this.getPackageName(),
PackageManager.GET_META_DATA);
Bundle bundle = ai.metaData;
if (bundle != null && bundle.containsKey("APPLICATION_CLASS_NAME")) {
appClassName = bundle.getString("APPLICATION_CLASS_NAME");//className 是配置在xml文件中的。
} else {
Log.i("demo", "have no application class name");
return;
}
} catch (NameNotFoundException e) {
Log.i("demo", "error:"+Log.getStackTraceString(e));
e.printStackTrace();
}
//有值的话调用该Applicaiton
Object currentActivityThread = RefInvoke.invokeStaticMethod(
"android.app.ActivityThread", "currentActivityThread",
new Class[] {}, new Object[] {});
Object mBoundApplication = RefInvoke.getFieldOjbect(
"android.app.ActivityThread", currentActivityThread,
"mBoundApplication");
Object loadedApkInfo = RefInvoke.getFieldOjbect(
"android.app.ActivityThread$AppBindData",
mBoundApplication, "info");
//把当前进程的mApplication 设置成了null
RefInvoke.setFieldOjbect("android.app.LoadedApk", "mApplication",
loadedApkInfo, null);
Object oldApplication = RefInvoke.getFieldOjbect(
"android.app.ActivityThread", currentActivityThread,
"mInitialApplication");
//http://www.codeceo.com/article/android-context.html
ArrayList<Application> mAllApplications = (ArrayList<Application>) RefInvoke
.getFieldOjbect("android.app.ActivityThread",
currentActivityThread, "mAllApplications");
mAllApplications.remove(oldApplication); // 删除oldApplication
ApplicationInfo appinfo_In_LoadedApk = (ApplicationInfo) RefInvoke
.getFieldOjbect("android.app.LoadedApk", loadedApkInfo,
"mApplicationInfo");
ApplicationInfo appinfo_In_AppBindData = (ApplicationInfo) RefInvoke
.getFieldOjbect("android.app.ActivityThread$AppBindData",
mBoundApplication, "appInfo");
appinfo_In_LoadedApk.className = appClassName;
appinfo_In_AppBindData.className = appClassName;
Application app = (Application) RefInvoke.invokeMethod(
"android.app.LoadedApk", "makeApplication", loadedApkInfo,
new Class[] { boolean.class, Instrumentation.class },
new Object[] { false, null }); // 执行 makeApplication(false,null)
RefInvoke.setFieldOjbect("android.app.ActivityThread",
"mInitialApplication", currentActivityThread, app);
ArrayMap mProviderMap = (ArrayMap) RefInvoke.getFieldOjbect(
"android.app.ActivityThread", currentActivityThread,
"mProviderMap");
Iterator it = mProviderMap.values().iterator();
while (it.hasNext()) {
Object providerClientRecord = it.next();
Object localProvider = RefInvoke.getFieldOjbect(
"android.app.ActivityThread$ProviderClientRecord",
providerClientRecord, "mLocalProvider");
RefInvoke.setFieldOjbect("android.content.ContentProvider",
"mContext", localProvider, app);
}
Log.i("demo", "app:"+app);
app.onCreate();
}
}
下面来看一下AndroidManifest.xml文件中的内容:这里我们定义了源程序APK的Application类名。1
2
3
4
5
6
7<application
android:allowBackup="true"
android:icon="@drawable/ic_launcher"
android:label="@string/app_name"
android:name="com.example.packapk.ProxyApplication">
<meta-data android:name="APPLICATION_CLASS_NAME" android:value="com.example.sourceapk.MyApplication"/>
项目下载
运行程序
下面就看看程序的运行步骤:
- 第一步:得到源程序APK文件和壳程序的DEX文件
运行源程序和壳程序项目,之后得到这两个文件(将壳程序的classes.dex文件改名为SourceApk.dex),然后使用加密工具进行加壳。 - 第二步:替换壳程序中的classes.dex文件
我们在第一步中得到加壳之后的classes.dex文件之后,将其与PackApk.apk中的原classes.dex文件替换。 - 第三步:在第二步的时候得到替换之后的PackApk.apk文件,这个文件因为被修改了,所以我们需要重新对它签名,不然运行也是报错的。
签名之后的文件就可以运行了,效果如下: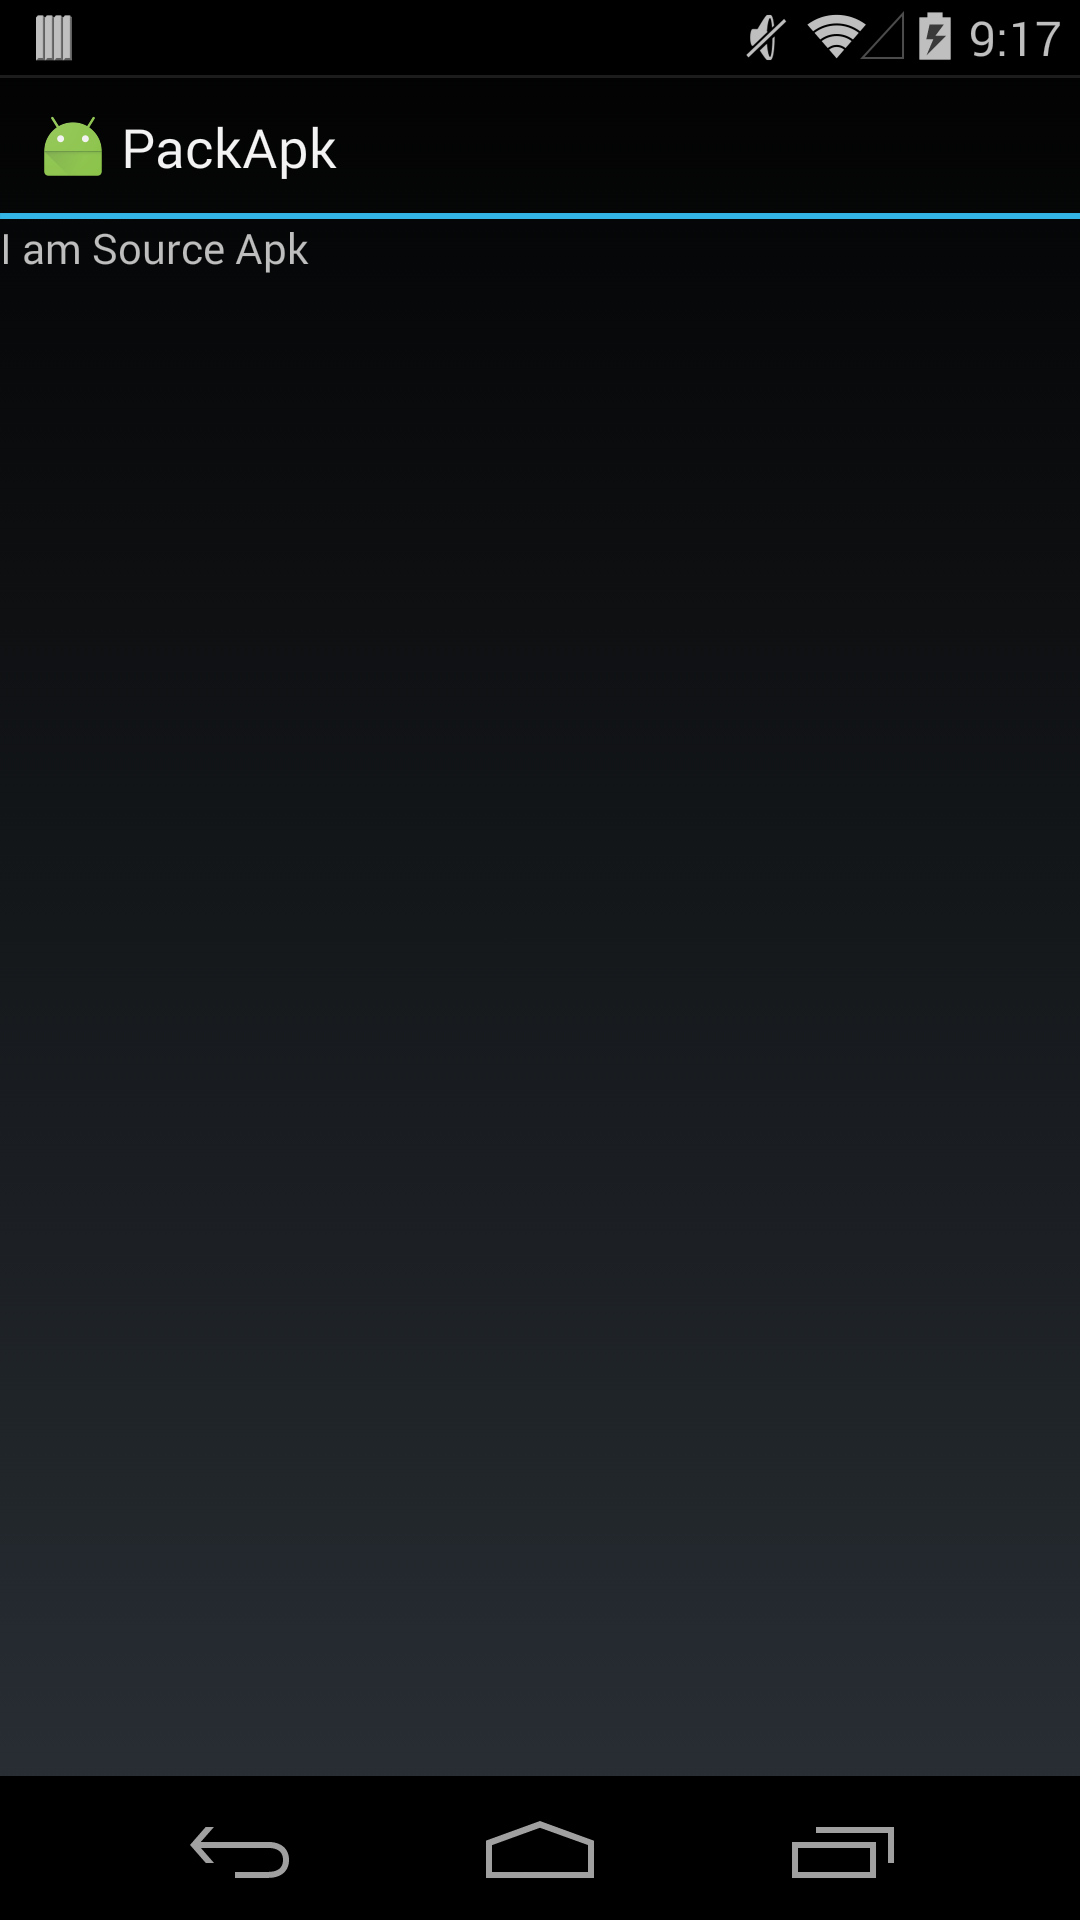
reference
http://blog.csdn.net/jiangwei0910410003/article/details/48415225/